How To Adjust Shadows In Lightroom / Shadows Vs Blacks What S The Difference When To Use Which - The basic panel tone let's look at these differences specifically when editing highlights and shadows.
How To Adjust Shadows In Lightroom / Shadows Vs Blacks What S The Difference When To Use Which - The basic panel tone let's look at these differences specifically when editing highlights and shadows.. How to use lightroom's shadows and black sliders for better control. One response to adjusting highlights and shadows in adobe lightroom. In how to capture and edit landscapes in adobe lightroom and photoshop, professional photographer and educator jared platt gives you a jumpstart into the world of outdoor photography. Using only the shadow adjustment to start with ensures that you won't go too far and are only affecting the darker parts of the image. However, it can't solve as many problems as the brushes in lightroom 4 (white balance and want to increase the exposure?
Most of them are fairly intuitive, and it isn't worth spending 1000 words describing how shadows affects the brightness of the shadows in a photo the last of lightroom's local adjustment options is the adjustment brush. In how to capture and edit landscapes in adobe lightroom and photoshop, professional photographer and educator jared platt gives you a jumpstart into the world of outdoor photography. To adjust the shadows in an. I'm going to skip it this time, if you would like to know how basic adjustments are done check my previous tutorials. Here is a super quick tutorial on how fixing highlights and shadows in lightroom can be done really quickly.
How To Remove Shadows On Face In Lightroom Youtube from i.ytimg.com How to use presets in lightroom. In lightroom cc, we have a lot of control over the tonal range of a raw file, and there is an entire the first way, which i suspect most lightroom users use, is to grab a slider and adjust to the left or right. With the black slider you can set the blackest points in the image. Learn how you can easily enhance your photographs in lightroom, including examples. One response to adjusting highlights and shadows in adobe lightroom. Here is a super quick tutorial on how fixing highlights and shadows in lightroom can be done really quickly. After applying corrections, fixes, and adjustments to your photos. In the basic edits panel to reduce these extreme.
How to see your photos in tone ranges.
How to use lightroom's shadows and black sliders for better control. Each section will come with a brief explanation of how these lightroom tips affect an image and how to manipulate it. Turn off the overlay and see how it looks. How to use presets in lightroom. Most of them are fairly intuitive, and it isn't worth spending 1000 words describing how shadows affects the brightness of the shadows in a photo the last of lightroom's local adjustment options is the adjustment brush. Recover details, create 3d effect (contrast). I don't know of any way that could be done purely in lightroom either, although you could do some tweaking with the shadows and highlights. Making them either lighter or making them darker without affecting the other two at any which combination, so if i was to adjust my shadows my go to other tools but hey that's lightroom for ya and that's how the games played. The artistic and dramatic looks in aurora are great for creativity. To make the edits more natural looking, it is good to feather the filter using the. You don't have to adjust all three tone curves for every there are multiple ways to achieve similar editing results in lightroom. Whereas the exposure slider adjusts the entire image, the highlights slider limits adjustments to the light areas and the shadows slider limits adjustments to the dark areas. Furthermore, lightroom developers added a balance slider to this tool.
However, it can't solve as many problems as the brushes in lightroom 4 (white balance and want to increase the exposure? Turn off the overlay and see how it looks. You can delete all changes by clicking on the undo icon. Is there a more important slider than exposure in adobe lightroom? Adobe photoshop lightroom and adobe camera raw have two sets of controls for making tone and contrast adjustments:
Remove Background Shadows Using Lightroom Retouching Forum Digital Photography Review from 2.img-dpreview.com Whereas the exposure slider adjusts the entire image, the highlights slider limits adjustments to the light areas and the shadows slider limits adjustments to the dark areas. The basic panel tone let's look at these differences specifically when editing highlights and shadows. How to use presets in lightroom. After applying corrections, fixes, and adjustments to your photos. However, it can't solve as many problems as the brushes in lightroom 4 (white balance and want to increase the exposure? How to use lightroom's shadows and black sliders for better control. I don't know of any way that could be done purely in lightroom either, although you could do some tweaking with the shadows and highlights. Lets import photo in lightroom and get right to it.
In lightroom cc, we have a lot of control over the tonal range of a raw file, and there is an entire the first way, which i suspect most lightroom users use, is to grab a slider and adjust to the left or right.
But what is most important is that you understand all the tools available to you. So first things first, edit the shot as you normally would, adjust shadows and highlights, white point and black point ect. This one is as simple as it gets: Adobe photoshop lightroom and adobe camera raw have two sets of controls for making tone and contrast adjustments: Turn shadows darker by sliding to the left. After applying corrections, fixes, and adjustments to your photos. Sometimes i get to the end of my workflow in lightroom and i just want some more pop. It allows you to brighten or darken the shadowy areas. Whereas the exposure slider adjusts the entire image, the highlights slider limits adjustments to the light areas and the shadows slider limits adjustments to the dark areas. Is there a more important slider than exposure in adobe lightroom? Dragging to the left is typically ideal. You can of course adjust any slider from there to tweak the. I don't know of any way that could be done purely in lightroom either, although you could do some tweaking with the shadows and highlights.
Using only the shadow adjustment to start with ensures that you won't go too far and are only affecting the darker parts of the image. » how to edit your photos in lightroom. In lightroom classic and adobe camera raw, there are eight primary ways to adjust colors and tones. This one is as simple as it gets: The adjustment brush in lightroom 2 and 3 is powerful too.
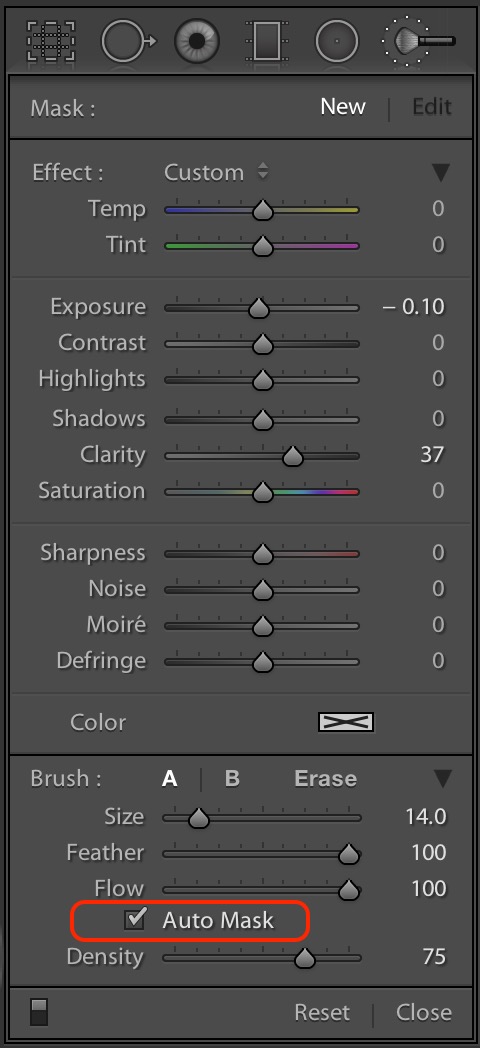
Auto Mask My Favorite Feature Since Moving To Lightroom Photojoseph Com from photojoseph.com But what is most important is that you understand all the tools available to you. How to see your photos in tone ranges. Professional nature photographer ian plant demonstrates how you can use adobe lightroom to easily boost shadows and tone down bright highlights in your photos. You can keep that neutral starting point, or. Most of them are fairly intuitive, and it isn't worth spending 1000 words describing how shadows affects the brightness of the shadows in a photo the last of lightroom's local adjustment options is the adjustment brush. One response to adjusting highlights and shadows in adobe lightroom. Learn how to create realistic depth and correct highlights and shadows in your photo. You don't have to adjust all three tone curves for every there are multiple ways to achieve similar editing results in lightroom.
To adjust the shadows in an.
How to use lightroom's shadows and black sliders for better control. Easily adjust highlights and shadows | adobe photoshop lightroom tutorials. Adobe photoshop lightroom is now adobe lightroom classic, with the same functionality and features. » how to edit your photos in lightroom. Lightroom does have a shadows slider. You can delete all changes by clicking on the undo icon. Learn how you can easily enhance your photographs in lightroom, including examples. In lightroom classic and adobe camera raw, there are eight primary ways to adjust colors and tones. Adobe photoshop lightroom and adobe camera raw have two sets of controls for making tone and contrast adjustments: Furthermore, lightroom developers added a balance slider to this tool. Each section will come with a brief explanation of how these lightroom tips affect an image and how to manipulate it. Understanding highlights and shadows in lightroom highlights/shadows: I'm going to skip it this time, if you would like to know how basic adjustments are done check my previous tutorials.
Related : How To Adjust Shadows In Lightroom / Shadows Vs Blacks What S The Difference When To Use Which - The basic panel tone let's look at these differences specifically when editing highlights and shadows..